How to re-install the OS on an Auto Deploy Server from 1GServers.com.
Needing to re-install an operating system onto a dedicated server is necessary from time to time. Whether your server needs a fresh start, you want to upgrade the OS or if you simply want to switch operating systems, we’ve made it very simple to do.
Usually to accomplish this, you’ll need to open a ticket with your hosting provider, then wait upwards of 24 hours for them to perform the installation. The good news is, if you have an Auto Deploy Server from 1GServers, you can accomplish this from within the Client Portal. On top of that, it only takes about 20 minutes.
IMPORTANT NOTE:
Re-installing an operating system on your auto deploy server with 1GServers will wipe all data. Be sure you have made a backup of all of your important data before you begin.
Step 1: Login to your 1GServers Client Portal account.
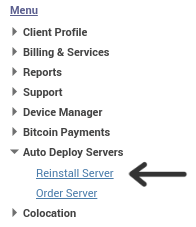
Step 2: On the left hand menu, expand the “Auto Deploy Servers” section.
Step 3: Click on the “Reinstall Server” option.

Step 4: It will ask you to verify your portal password as a security check. Enter your portal password and click “Verify”.
Step 5: On this page, you’ll see a list of all your Auto Deploy Servers. Next to the server you wish to have the OS re-installed on, select the operating system to install, then click on the “Install OS Now” button.

Hooray! The 1GServers automated technology will do the rest. Now is your chance to grab your caffeinated beverage of choice. Just don’t go too far, because within 20 minutes, your server will be waiting to go to work for you again.
You’ll also receive an e-mail confirmation once your server installation has completed, containing the login info.
To obtain an Auto Deploy Server, simply visit https://1gservers.com/auto-deploy-servers.html. You’ll see a list of the complete stock of pre-configured servers currently available. Click on the “Deploy” button next to the server you want.
There are a variety of pre-configured dedicated servers for you to choose from, including:


